Intro
만일, 안드로이드 개발 시 정확한 아키텍처를 사용하지 않는다면, 코드가 많아지고 팀이 확장됨에 따라 유지보수가 어려워진다.
MVVM과 Clean Architecture를 통해 분리되고, 테스트 가능성을 높이고, 유지보수가 용이한 코드를 작성하는 방법을 알아보자.
왜 MVVM과 Clean Architecture인가?
MVVM(Model + View + ViewModel)은 View(ex: Activity, Fragment 등)와 비즈니스 로직을 분리해준다. MVVM은 간단한 ㅂ=프로젝트로는 충분히 괜찮지만 코드가 점점 커지면 ViewModel 또한 커진다. 그렇다면 각자의 역할을 분리하기가 어려워지는데..
MVVM과 Clean Architecture는 코드가 점점 커지는 것과 같은 문제에 아주 효율적이다. 이 조합은 우리의 코드의 역할 분리를 한단계 넘어선 방법이다. 즉, 앱에서 수행할 수 있는 작업의 논리를 명확하게 추상화한다.
*물론, MVP(Model-View-Presenter)과 Clean Architecture도 좋다. 하지만 AAC(Android Architecture Components)는 이미 ViewModel 클래스를 내장해 제공해줘 MVVM 프레임워크가 필요하지 않은 MVP를 통한 MVVM을 사용할 것이다.
Clean Architecture의 장점
1. 일반 MVVM 보다 훨씬 더 테스트를 쉽게 할 수 있다.
2. 코드가 더 잘 분리된다. **굉장히 큰 장점
3. 패키지 구조를 찾기가 더 쉽다.
4. 프로젝트 유지보수가 더 쉽다.
5. 팀원이 새로운 기능을 추가하는데 더 빨라진다.
Clean Architecture의 단점
1. 공부하는데 꽤 걸린다..간단한 MVVM, MVP와 같은 패턴만 공부한경우 모든 레이어의 작동방식을 이해하는데 시간이 걸린다..
2. 많은 부가적인 클래스가 추가됨으로써, 간단한 프로젝트에는 적합하지 않다.
이번 예제의 데이터 플로우는 다음과 같다.
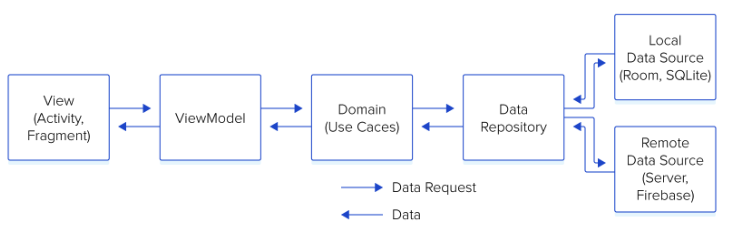
비즈니스 로직은 UI와 완전 분리된다. 이는 코드를 아주 쉽게 유지보수하고 테스트 할 수 있도록 만들어준다.
예제는 아주 간단하다.. 사용자가 새 게시물을 만들고 그들이 만든 게시물 목록을 볼 수 있다.
물론, 이 예제는 라이브러리(Dagger, RxJava등)를 사용하지 않는다.
MVVM의 레이어와 Clean Architecture
코드는 다음 세가지로 분리된다.
1. Presentation Layer(=UI Layer)
2. Domain Layer
3. Data Layer
아래는 각 레이어에 대한 패키지 상세 내용이다.
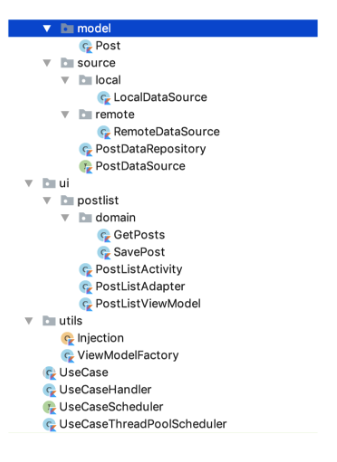
우리가 사용하는 Android 앱 아키텍처 내에서도 파일/폴더 계층 구조를 구성하는 다양한 방법들이 있다.
Presentation Layer(=UI Layer)
Presentation Layer는 View(Activity, Fragment)와, 그리고 ViewModel들을 포함한다.
**View는 가능한 단순해야된다. 절대 절대 비즈니스 로직을 넣지말아야 한다....**
안드로이드 개발 문서 AAC에도 나와 있다.. 간단한 UI Logic은 괜찮지만, 비즈니스 로직은 놉.
Activity는 ViewModel과 소통하고, ViewModel은 액션을 취하기 위해 Domain Layer와 소통한다.
우선, 하나의 UseCaseHandler과 두개의 Usecase를 ViewModel에 전달한다. 아래 자세히 다루겠지만, 이 아키텍처에서 UseCase는 ViewModel이 Data Layer과 상호작용하는 방식을 정의하는 작업이다.
class PostListViewModel(
        val useCaseHandler: UseCaseHandler,
        val getPosts: GetPosts,
        val savePost: SavePost): ViewModel() {


    fun getAllPosts(userId: Int, callback: PostDataSource.LoadPostsCallback) {
        val requestValue = GetPosts.RequestValues(userId)
        useCaseHandler.execute(getPosts, requestValue, object :
        UseCase.UseCaseCallback<GetPosts.ResponseValue> {
            override fun onSuccess(response: GetPosts.ResponseValue) {
                callback.onPostsLoaded(response.posts)
            }

            override fun onError(t: Throwable) {
                callback.onError(t)
            }
        })
    }

    fun savePost(post: Post, callback: PostDataSource.SaveTaskCallback) {
        val requestValues = SavePost.RequestValues(post)
        useCaseHandler.execute(savePost, requestValues, object :
        UseCase.UseCaseCallback<SavePost.ResponseValue> {
            override fun onSuccess(response: SavePost.ResponseValue) {
                callback.onSaveSuccess()
            }
            override fun onError(t: Throwable) {
                callback.onError(t)
            }
        })
    }

}
Domain Layer
Domain Layer는 어플리케이션의 모든 UseCase를 갖고있다. 이 예에서는 추상화 클래스인 UseCase를 갖고 있으며, 모든 UseCase들은 이 클래스를 확장할 것이다.
abstract class UseCase<Q : UseCase.RequestValues, P : UseCase.ResponseValue> {

    var requestValues: Q? = null

    var useCaseCallback: UseCaseCallback<P>? = null

    internal fun run() {
        executeUseCase(requestValues)
    }

    protected abstract fun executeUseCase(requestValues: Q?)

    /**
     * Data passed to a request.
     */
    interface RequestValues

    /**
     * Data received from a request.
     */
    interface ResponseValue

    interface UseCaseCallback<R> {
        fun onSuccess(response: R)
        fun onError(t: Throwable)
    }
}
또한, UseCaseHandler는 UseCase의 핸들링을 담당한다. 절대 데이터베이스나 서버로부터 데이터를 가져오는 과정에서 UI가 멈추면 안된다.
다음 코드는 백그라운드 스레드에서 UseCase를 실행하고 메인 스레드에서 응답을 수신하기로 결정하는 곳이다.
class UseCaseHandler(private val mUseCaseScheduler: UseCaseScheduler) {

    fun <T : UseCase.RequestValues, R : UseCase.ResponseValue> execute(
            useCase: UseCase<T, R>, values: T, callback: UseCase.UseCaseCallback<R>) {
        useCase.requestValues = values
        useCase.useCaseCallback = UiCallbackWrapper(callback, this)

        mUseCaseScheduler.execute(Runnable {
            useCase.run()
        })
    }

    private fun <V : UseCase.ResponseValue> notifyResponse(response: V,
                                                   useCaseCallback: UseCase.UseCaseCallback<V>) {
        mUseCaseScheduler.notifyResponse(response, useCaseCallback)
    }

    private fun <V : UseCase.ResponseValue> notifyError(
            useCaseCallback: UseCase.UseCaseCallback<V>, t: Throwable) {
        mUseCaseScheduler.onError(useCaseCallback, t)
    }

    private class UiCallbackWrapper<V : UseCase.ResponseValue>(
    private val mCallback: UseCase.UseCaseCallback<V>,
    private val mUseCaseHandler: UseCaseHandler) : UseCase.UseCaseCallback<V> {

        override fun onSuccess(response: V) {
            mUseCaseHandler.notifyResponse(response, mCallback)
        }

        override fun onError(t: Throwable) {
            mUseCaseHandler.notifyError(mCallback, t)
        }
    }

    companion object {

        private var INSTANCE: UseCaseHandler? = null
        fun getInstance(): UseCaseHandler {
            if (INSTANCE == null) {
                INSTANCE = UseCaseHandler(UseCaseThreadPoolScheduler())
            }
            return INSTANCE!!
        }
    }
}
이름에서 알 수 있듯이 GetPosts UseCase는 사용자의 모든 게시물을 가져오는 역할을 한다.
class GetPosts(private val mDataSource: PostDataSource) :
UseCase<GetPosts.RequestValues, GetPosts.ResponseValue>() {

    protected override fun executeUseCase(requestValues: GetPosts.RequestValues?) {
        mDataSource.getPosts(requestValues?.userId ?: -1, object :
        PostDataSource.LoadPostsCallback {
            override fun onPostsLoaded(posts: List<Post>) {
                val responseValue = ResponseValue(posts)
                useCaseCallback?.onSuccess(responseValue)
            }
            override fun onError(t: Throwable) {
                // Never use generic exceptions. Create proper exceptions. Since
                // our use case is different we will go with generic throwable
                useCaseCallback?.onError(Throwable("Data not found"))
            }
        })
    }
    class RequestValues(val userId: Int) : UseCase.RequestValues
    class ResponseValue(val posts: List<Post>) : UseCase.ResponseValue
}
UseCase의 목적은 ViewModel과 Repository 사이의 중재자 역할이다.
만약, 나중에 "게시물 작성" 기능을 추가한다고 가정해보자. 해야할것은 새로운 "EditPost" UseCase이고, 모든 코드는 다른 UseCase들로부터 완전 분리되어질 것이다.
아마, 공부를 좀 해보고 예제를 만들어봤다면 새로운 기능이 도입되고 기존 코드가 망가지는 현상을 많이 봤을 것이다...
분리된 UseCase는 이를 피할 수 있도록 만들어준다.
물론, 100퍼센트 이런 문제를 제거할 수는 없지만 최소화 할 수 있다.
이것이 Clean Architecture를 다른 패턴과 구분하는 이유다. 코드를 완전히 분리시켜 모든 레이어를 블랙박스로 취급할 수 있다.
Data Layer
이 레이어는 도메인 레이어에서 사용할 수 있는 모든 레포지토리(저장소)를 갖고 있다. 이 레이어는 데이터 소스 API들을 외부 클래스로 노출시킨다.
interface PostDataSource {

    interface LoadPostsCallback {
        fun onPostsLoaded(posts: List<Post>)
        fun onError(t: Throwable)
    }

    interface SaveTaskCallback {
        fun onSaveSuccess()
        fun onError(t: Throwable)
    }

    fun getPosts(userId: Int, callback: LoadPostsCallback)
    fun savePost(post: Post)
}
PostDataRepository는 PostDataSouce를 시행한다. 이는 우리가 로컬 데이터베이스로부터 데이터를 가져오는지 혹은 서버로부터 요청하는지를 결정한다.
class PostDataRepository private constructor(
        private val localDataSource: PostDataSource,
        private val remoteDataSource: PostDataSource): PostDataSource {

    companion object {
        private var INSTANCE: PostDataRepository? = null
        fun getInstance(localDataSource: PostDataSource,
        remoteDataSource: PostDataSource): PostDataRepository {
            if (INSTANCE == null) {
                INSTANCE = PostDataRepository(localDataSource, remoteDataSource)
            }
            return INSTANCE!!
        }
    }
    var isCacheDirty = false
    override fun getPosts(userId: Int, callback: PostDataSource.LoadPostsCallback) {
        if (isCacheDirty) {
            getPostsFromServer(userId, callback)
        } else {
            localDataSource.getPosts(userId, object : PostDataSource.LoadPostsCallback {
                override fun onPostsLoaded(posts: List<Post>) {
                    refreshCache()
                    callback.onPostsLoaded(posts)
                }
                override fun onError(t: Throwable) {
                    getPostsFromServer(userId, callback)
                }
            })
        }
    }
    override fun savePost(post: Post) {
        localDataSource.savePost(post)
        remoteDataSource.savePost(post)
    }
    private fun getPostsFromServer(userId: Int, callback: PostDataSource.LoadPostsCallback) {
        remoteDataSource.getPosts(userId, object : PostDataSource.LoadPostsCallback {
            override fun onPostsLoaded(posts: List<Post>) {
                refreshCache()
                refreshLocalDataSource(posts)
                callback.onPostsLoaded(posts)
            }
            override fun onError(t: Throwable) {
                callback.onError(t)
            }
        })
    }
    private fun refreshLocalDataSource(posts: List<Post>) {
        posts.forEach {
            localDataSource.savePost(it)
        }
    }
    private fun refreshCache() {
        isCacheDirty = false
    }
}
이 클래스에는 localDataSource와 remoteDataSource라는 두개의 변수가 있다. 이 타입들은 PostDataSource이므로 실제로 내부적 구현 방식은 신경 쓰지 않는다.
상기 작가는 이렇게 말을한다.
[In my personal experience, this architecture has proved to be invaluable. In one of my apps, I started with Firebase on the back end which is great for quickly building your app. I knew eventually I’d have to shift to my own server.
When I did, all I had to do was change the implementation in RemoteDataSource. I didn’t have to touch any other class even after such a huge change. That is the advantage of decoupled code. Changing any given class shouldn’t affect other parts of your code.]
-> 개인적인 경험에 따르면, 이 아키텍처는 아주 귀중한 것으로 증명되었다. 나의 앱들 중 하나는, 백엔드에서 Firebase를 시작했는데 이는 앱을 빠르게 빌드하는데 유용하다. 하지만 결국 내 서버로 옮겨야 한다는 것을 알았다.
내가 해본결과, RemoteDataSource에서 구현을 변경하기만 하면된다. 이렇게 큰 변화를 겪은 뒤에도 다른 클래스를 건드릴 필요가 없었다. 이것이 분리된 코드의 장점이다. 주어진 클래스를 변경해도 코드의 다른 부분에는 영향을 미치지 않는다.
이거를 보고, 내 프로젝트 경험과 빗대어 생각해 보니 명확히 이해가 가며 이 아키텍처의 소중함을 다시한번 깨닫게 되었다.....와...
몇몇 부가적인 클래스는 다음과 같다.
interface UseCaseScheduler {

    fun execute(runnable: Runnable)

    fun <V : UseCase.ResponseValue> notifyResponse(response: V,
                                                   useCaseCallback: UseCase.UseCaseCallback<V>)

    fun <V : UseCase.ResponseValue> onError(
            useCaseCallback: UseCase.UseCaseCallback<V>, t: Throwable)
}


class UseCaseThreadPoolScheduler : UseCaseScheduler {

    val POOL_SIZE = 2

    val MAX_POOL_SIZE = 4

    val TIMEOUT = 30

    private val mHandler = Handler()

    internal var mThreadPoolExecutor: ThreadPoolExecutor

    init {
        mThreadPoolExecutor = ThreadPoolExecutor(POOL_SIZE, MAX_POOL_SIZE, TIMEOUT.toLong(),
                TimeUnit.SECONDS, ArrayBlockingQueue(POOL_SIZE))
    }

    override fun execute(runnable: Runnable) {
        mThreadPoolExecutor.execute(runnable)
    }

    override fun <V : UseCase.ResponseValue> notifyResponse(response: V,
                                                   useCaseCallback: UseCase.UseCaseCallback<V>) {
        mHandler.post { useCaseCallback.onSuccess(response) }
    }

    override fun <V : UseCase.ResponseValue> onError(
            useCaseCallback: UseCase.UseCaseCallback<V>, t: Throwable) {
        mHandler.post { useCaseCallback.onError(t) }
    }

}
UseCaseThreadPoolScheduler는 ThreadPoolExecuter를 사용해 비도기 작업을 실행하는 역할을 한다.
class ViewModelFactory : ViewModelProvider.Factory {


    override fun <T : ViewModel> create(modelClass: Class<T>): T {
        if (modelClass == PostListViewModel::class.java) {
            return PostListViewModel(
                    Injection.provideUseCaseHandler()
                    , Injection.provideGetPosts(), Injection.provideSavePost()) as T
        }
        throw IllegalArgumentException("unknown model class $modelClass")
    }

    companion object {
        private var INSTANCE: ViewModelFactory? = null
        fun getInstance(): ViewModelFactory {
            if (INSTANCE == null) {
                INSTANCE = ViewModelFactory()
            }
            return INSTANCE!!
        }
    }
}
상기 viewModelFactory를 통해 우리는 viewModel 생성자에서 인수를 전달하려면 이를 생성해야 한다.
Dependency Injection
다음 예를 통해 depenjency injection을 설명해본다. PostDataRepository 클래스를 보면 LocalDataSource와 RemoteDataSource가 있다. 우리는 Injection클래스를 통해 이러한 디펜던시를 PostDataRepository 클래스에 제공해준다.
디펜던시를 injectiong하는 것은 두 가지 이점이 있다.
1. 전체 코드베이스에 걸쳐 개체를 분산시키는 대신 중앙 위치에서 개체의 인스턴스화를 제어할 수 있다는 것이다.
2. PostDataRepository에 대한 단위 테스트를 작성하는 데 도움이 된다. 왜냐하면 실제 값 대신 PostDataRepository 생성자에 LocalDataSource, RemoteDataSource의 모의 버전을 전달할 수 있기 때문이다.
object Injection {

    fun providePostDataRepository(): PostDataRepository {
        return PostDataRepository.getInstance(provideLocalDataSource(), provideRemoteDataSource())
    }

    fun provideViewModelFactory() = ViewModelFactory.getInstance()

    fun provideLocalDataSource(): PostDataSource = LocalDataSource.getInstance()

    fun provideRemoteDataSource(): PostDataSource = RemoteDataSource.getInstance()

    fun provideGetPosts() = GetPosts(providePostDataRepository())

    fun provideSavePost() = SavePost(providePostDataRepository())

    fun provideUseCaseHandler() = UseCaseHandler.getInstance()
}
[출처]
https://www.toptal.com/android/android-apps-mvvm-with-clean-architecture
'Computer engineering > Android Programming' 카테고리의 다른 글
| AAC_ViewModel2 (0) | 2022.07.12 |
|---|---|
| AAC_ViewModel_1 (0) | 2022.07.12 |
| 4. Architecture Component UI Layer Data Binding_3 (1) | 2022.07.10 |
| 3. Architecture Component UI Layer Data Binding_2 (0) | 2022.07.10 |
| 2. Architecture Component UI Layer Data Binding_1 (0) | 2022.07.10 |